Learn why inspecting sensitive sockets like the ECM, PCM, and transmission control module connectors is crucial for a reliable vehicle connection. These connectors can house over 200 delicate pins that, if misaligned or damaged, can trigger error codes—or worse, prevent the vehicle from running. Before plugging in a wiring harness, take a close look to ensure all pins are intact and free from debris. This simple check can save you from major headaches down the road.
This video is sponsored by Auto Value and Bumper to Bumper.
The post ECM Connector Damage appeared first on Brake & Front End.
Eric Garbe is a graduate of Columbus State Community College with a degree in Automotive Maintenance Technology. He has extensive independent and dealership field experience as a technician and shop owner and is an ASE Certified Master Technician and former Adjunct Automotive Professor. He has been professionally writing automotive technical articles and documents for many years and in his free time enjoys restoring old cars and creating custom interiors and upholstery.
Published:
Explore the advantages of monobloc CV axles in this video. With increased strength, reduced weight, and enhanced performance, monobloc CV axles are engineered to meet the demands of high-performance and off-road vehicles.
These axles are built for durability, efficient power transfer, and smoother rides while minimizing maintenance requirements.
Electric infrared curing technology is a great addition to your paint booth’s curing mode and may significantly shorten drying times for any type of paint, whether you utilise a mobile or rail-mounted system.They cut the hours-long drying process down to minutes.
Paint curing in cold weather might take up to twice as long, which will significantly lower your productivity. However, you can cure body fillers, paints, primers, and lacquers in less than ten minutes if you use an IR paint booth.
Classification of Infrared waves
Three types of infrared heating are commonly distinguished: short wave, medium wave, and long wave. A portion of the sun’s natural light spectrum, infrared waves don’t cause damage to skin like UV rays.
Short Wave
Refers to non-visible light with a wavelength of around 1400–3000 nanometres (nm). Because SWIR light falls outside of the visible spectrum (400–700 nm), it is invisible to the human eye
Medium Wave
A portion of the electromagnetic spectrum’s infrared band that spans wavelengths of 3µm to 5µm (3,000–5,000nm). Thermal imaging cameras that are not cooled detect radiant heat like this.
Long Wave
The subset of infrared band of the electromagnetic spectrum, covering the wavelengths ranging from 8µm to 14µm (8,000 to 14,000nm).
Heat Transfer Methods
Conduction
In the Conduction method, the heat transfer occurs between objects by direct contact.
Convection
In the Convection method, the heat transfer takes within the fluid.
Radiation
In the Radiation method, the heat transfer occurs without involving particles through electromagnetic waves.
How to Infrared dryer works?
A reflector and a heating element are the two main parts of an infrared heater. Heat is produced by the heating element from chemical energy received from fuel or electricity. This thermal energy is then directed towards surrounding objects by the reflector as radiant heat.
Types of Infrared heaters
There are three major industrial infrared heaters: quartz, ceramic, and metal sheaths. These heaters use electromagnetic infrared rays, achieving temperature from 1300 ° F to 1600 ° F (704 ° C to 871 ° C) according to their structure, and improving both efficiency and productivity. You can do it. Among them, quartz heaters are known to reach the highest temperatures and ceramic heaters are the most economical.
Quartz Infrared Heaters : Quartz infrared heaters produce short wavelengths and provide the hottest type of infrared heat. They are great for high temperature applications but are not suitable for heating open spaces.
Ceramic infrared stammering : inexpensive ceramic infrared radiators and are used for heat places.
Metal infrared storm : metal infrared radiators are the most durable and can reach a temperature higher than 2000 ° F (1093 ° C). It can be used in immersion heating systems.
Solution for Paint Baking
ATS ELGI Offers Paint Booth with Infrared system. Infrared (IR) dryers are globally invented and in a very short time, itsucceeds in providing a professional solution for drying a painted surface with better quality.
ATS ELGI are excited to announce the Product update for our all-newAutomatic Tyre Changer INV,which can be used for tyre changing purpose of all type of passenger Vehicles and LCV with Inverter Technology.
It offers a variable speed rotation via the built-in inverter technology gear box with motor which controls the speed of the turntable dependent on the torque required when mounting/demounting the tyre while pressing the pedal.
What is the Inverter Technology?
Based on the load, the inverter technology determines the optimum speed at which the machines should run. This is achieved by using VFD (variable frequency drive) motors that run at variable speeds. Due to this, less energy is consumed
In the Automatic tyre changaer, the motor and Gear box are directly coupled withoutusing belt and the motor is variable speed inverter motor, it given the variable rotation to the spindle depends on the input voltage while pressing in the pedal
Electric Vehicles (EVs) are transforming the future of transportation by offering lower emissions and higher energy efficiency compared to traditional internal combustion engines. At the heart of every EV lies a high-voltage (HV) battery system, which powers the vehicle. These batteries operate at voltages between 400 to 800 volts or more, these batteries present specific safety challenges that must be addressed during handling.
When transporting HV batteries to dealerships for replacement or servicing, the process of loading and unloading can be both difficult and time-consuming. To simplify this task and enhance safety, ATS ELGI has developed the EV Battery Stacker, designed specifically for the efficient and safe handling of HV batteries during loading and unloading from transport vehicles.
The EV Battery Stacker is engineered with advanced features that ensure precise and secure movement of these heavy and high-voltage batteries. Its ergonomic design not only reduces the physical strain on workers but also minimizes the risk of accidents during battery transfer. By providing stability and control, the stacker helps prevent damage to the battery and the vehicle, ensuring that the batteries remain intact during the entire loading and unloading process.
Driveshaft problems can be spotted from the moment you put the vehicle in gear to pull it into a bay. As the power is transmitted from the transmission to the rear axle, the slack from worn or damaged components is taken up, resulting in a sudden crunch or pop.
Once the vehicle is moving, you might hear a whine coming from the center of the vehicle. The noise will change as speed increases and might change as power is applied. If the vehicle is put into neutral, the sound remains the same.
The problem could be the center bearing’s support. These are used if the driveline has a two-piece driveshaft. Engineers split the driveshaft into two sections to change the harmonics. The center bearing is a ball bearing mounted in a rubber cushion that attaches to a frame crossmember.
The cushion allows vertical motion at the driveline and helps isolate the vehicle from vibration. The bearing in most center supports is sealed for life. Some do have a zerk fitting from the factory, and some replacement units also have a way to lubricate the bearing.
Premature failure of the center bearing could be the result of too much driveshaft angle, the water shield being missing or damaged, road salt and moisture, or damaged rubber casings. Also, high mileage and bearing wear can contribute to premature wear. Other issues might be related to a leaking transmission or transfer case. Some of the additives in transmission fluid can rejuvenate seals in the transmission, but on the rubber of the center support bearing it can cause it to swell and degrade.
A small amount of noise is normal when using 4WD on a low-traction surface such as snow, ice, mud or sand. When operated in 4WD on a high-traction surface, such as clear pavement, the noise generated may be much more significant. This noise is the result of “driveline loading,” which can naturally occur in 4WD.
As a vehicle travels down the road, the tires rotate a certain number of times per mile depending on the tire circumference. If all the tires are not exactly the same circumference, they will turn at different rates. On these trucks, 4WD is a “part-time” system designed for use only on low-traction surfaces.
This system has no internal differential, so the front and rear propeller shafts will turn at the same speed.
On low-traction surfaces, different tire sizes won’t have much effect, as one tire can easily slip on the road surface to match the speed of the other tires.
On a high-traction surface, it is much more difficult for one tire to slip. Therefore, the 4WD operates under a “blind” to heavy-load condition, and noise is the result.
As tire rolling rates are a major factor in this condition, consider the following essential items:
All tires should be the same size and brand (excluding the spare tire). Tires of different brands may have different circumferences, even if they are the same size;
Check that tire pressure is equal in all four tires. A tire with low pressure will roll at a different rate;
All tires have approximately an equal amount of wear. Tires with varying amounts of wear will roll at different rates; and
Ensure that all tires are the same tread type. Don’t mix on- and off-road, all-season or street tires on the same truck, as they may have different circumferences and roll at different rates.
Driveline noises caused by loading in 4WD vehicles may be mistaken for transfer case or front axle noise because they can sound very similar. 4WD noise caused by loading may exhibit the following conditions:
The noise will be greatest on a clear, dry road and decrease on a low-traction surface. Front axle or transfer case noise caused by bearing, ring and pinion, or planetary gearing will be the same on all surfaces;
The sound will increase while making a tight turn. Most front axle or transfer case noises won’t increase;
The noise can be changed from a deceleration condition to acceleration (or acceleration to deceleration) by raising or lowering tire pressure at one end of the vehicle; or
One or more of the tires may show small, short scratches around the circumference of the tire tread. These scratches are caused by the tire slipping, or “scuffing,” on the road surface.
This noise should be considered normal and attempting to repair it will not result in satisfactory reductions to driveline noise. Any attempts to correct this condition by repairing these components may cause the customer to believe that the vehicle is unreliable and will also result in an inconvenience while their vehicle is out of service.
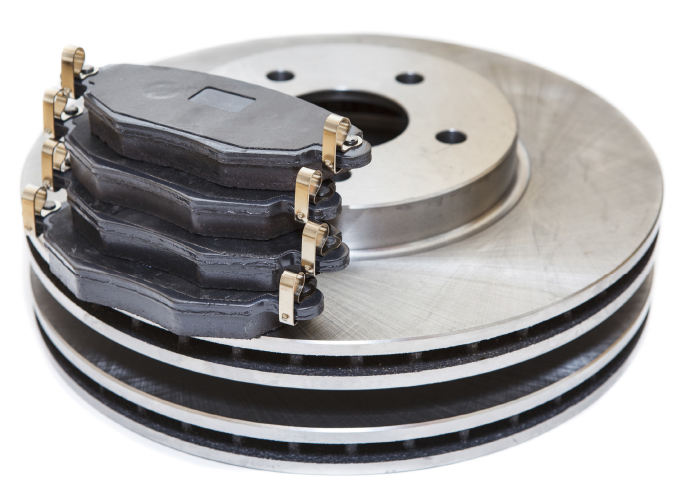
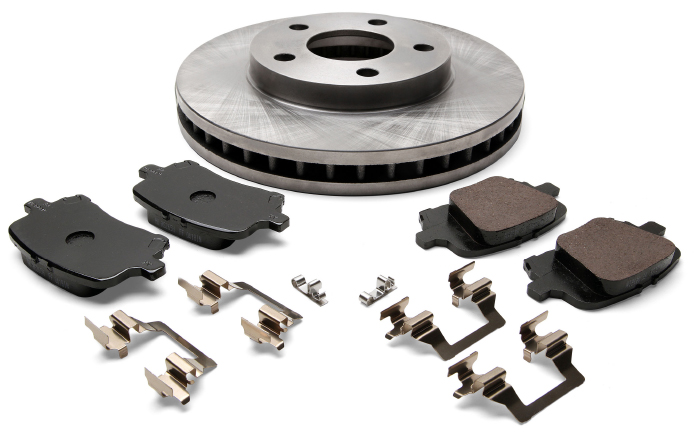
Drivers and technicians rarely make the connection between fuel economy and brakes. Moving the pads back from the rotor by only 1mm can increase fuel economy by as much as three to five percent. For engineers, it is a huge gain that does not involve exotic materials or adding expensive components.
Anti-Drag Systems
Reducing brake drag on late-model vehicles is not accomplished by a single component; it takes a system. At the master cylinder on some vehicles, there might be a quick-take-up valve in the replenish port to hydraulically pull the caliper piston back from the rotor. At the caliper, OEMs are using seals with a special profile designed to retract the piston. Some vehicles are even using the valves in the ABS module to electronically retract the pistons. On the caliper bracket, engineers are designing hardware that can push the pad away from the rotor.
None of the drag-reducing technologies will work if the caliper is not moving freely. This is why replacing the brake hardware every time the pads are serviced is critical.
Hardware Wears Out
Like all springs, brake hardware can fatigue over time due to movement and lose spring tension. Another factor is heat. Every time the driver applies the brakes, the clip goes through a heat cycle. These cycles can add up over the life of the hardware and cause fatigue and the loss of spring tension.
The other type of wear is physical. As the pads move in the bracket, metal and surface coatings on the abutment clips can wear away. No matter how much anti-seize or brake lubricant is applied, the hardware will not be returned to new condition.
Anti-Drag Hardware
For more than two decades, automakers have been introducing new brake hardware components to help push the pads back into the caliper bracket. Most technicians may call them anti-rattle clips, but it is also a way to improve the fuel economy of the vehicle.
One of the best examples of anti-drag hardware can be found on some late-model GM vehicles. This abutment clip has a metal finger that pushes the pad away from the rotor. On the other side of the clip is a small tab that secures the pad in the bracket so it will not rattle.
Dodge uses a similar design on its full-sized trucks that has clips on to the ears of the pad. These clips can be difficult to install, but they can save the driver gas and your shop a noise comeback.
Anti-drag hardware can also reduce disc thickness variation (DTV) that can cause pulsation complaints. Most vehicles have a lateral runout specification of less than 0.002”. This wobble motion can cause the pads to come in contact with the rotor. The high spot of the rotor’s runout might hit the brake pads. This removes a very small amount of material from the rotor at the high spot of the runout, which can cause DTV. If enough material is removed over thousands of miles, it will cause brake pedal pulsation.
Aftermarket Improvements
Manufacturers of brake pads and hardware are making hardware that is better than what was installed by the OEM. Some hardware kits are using coatings on the abutment clips that keep the pad moving over the life of the brake job. They are also using rubberized coatings to insulate the pads to prevent brake noise.
There are also add-on clips that clip onto the pads to reduce drag. The clips apply pressure on each of the brake pads to keep them from contacting the rotor when not in use. The pressure is light enough that it does not affect the braking system when the brakes are applied.
Electric vehicle charging cables are the conduits that transfer electricity from the power source to your car’s battery. They come in various lengths, power ratings, and connector types, depending on the make and model of your EV. Proper care and maintenance of these cables are crucial to ensure your charging experience is seamless and your vehicle’s battery remains healthy.
Maintaining your charging cable is not just about keeping it in good physical condition. It’s also about ensuring the safety and efficiency of your charging process. A well-maintained cable can help prevent electrical issues, reduce the risk of fire hazards, and even extend the lifespan of your car’s battery.
One of the most important aspects of maintaining your charging cable is regular inspections for any signs of damage. Before and after each use, take a few moments to carefully examine the cable, the connectors, and the plug-in points. Look for cracks, fraying, or any other visible signs of wear and tear. If you notice any issues, it’s best to address them immediately to prevent further damage and ensure your safety.
When not in use, it’s crucial to store your charging cable properly. Avoid leaving it coiled up in your car or exposed to the elements. Instead, invest in a dedicated storage solution, such as a cable management system or a protective sleeve. This will help prevent kinks, tangles, and exposure to moisture or extreme temperatures, which can all contribute to the deterioration of your cable.
Your car’s charging port and the connections on your charging cable are delicate components that require special care. Always make sure to keep these areas clean and free of debris, which can interfere with the charging process and potentially cause damage over time. Consider using a protective cover or cap when the cable is not in use to shield these critical points from the elements.
Proper usage is key to maintaining the longevity of your charging cable. Always follow the manufacturer’s instructions and avoid yanking or pulling on the cable when disconnecting it from the power source or your vehicle. Instead, gently grasp the connector and pull it out straight to prevent any undue stress on the internal components.
By staying vigilant and addressing any problems promptly, you can keep your charging cable and charging port in top condition and ensure a hassle-free charging experience.
This video is sponsored by Auto Value and Bumper to Bumper.
In this episode of Drivetime, we welcome Jayme Farina, Executive Vice President at AP Emissions, to share his career journey and insights into the automotive aftermarket industry. Farina reflects on his upbringing in West Texas, his education at Texas Tech and how he was introduced to the industry. He talks about his early career experiences, highlighting the importance of mentorship and how guidance from others helped shape his path.
Farina then delves into AP Emissions’ values, focusing on the company’s core pillars of trust, respect and collaboration. He explains how these principles have been fundamental to the company’s success and how they continue to drive the business forward under new ownership. He also discusses AP’s vertically integrated manufacturing process, which allows the company to respond quickly to market demands and stay at the forefront of product innovation.
Farina emphasizes the importance of the automotive aftermarket, encouraging young professionals to consider careers in the industry. He shares his belief in the value of giving back and supporting industry collaboration, which he sees as vital for long-term success.
Episode Overview:
How Jayme got started in the automotive aftermarket (0:59)
Jayme talk about impactful mentors in his life (4:09)
Discussion on the culture at AP Emissions (6:37)
How a recent buyout has impacted the company (8:33)
AP Emissions and vertical integration (11:20)
How Jayme gives back to his community (13:41)
Lightning Round (17:17)
The post Jayme Farina on Leadership, Mentorship and Driving Innovation appeared first on Brake & Front End.
eslaâs âRapid Mateâ connector connects the battery pack to the vehicle. The connection has two high-voltage power connections and a ground in the center. The connection is made by attaching the battery pack to the car. The male and female spades are joined as the battery pack is lifted into the vehicle.
This precision task requires careful positioning of the battery pack during removal and installation. Any misalignment errors may result in damage to the battery pack and rapid mate connector.
To remove the battery, follow all safety procedures to depower the battery and isolate the high-voltage system. If you are not trained to handle high voltage, do not attempt.
The battery pack is secured by more than 30 bolts. To prevent damage to the battery, you need an EV battery lift table like this to hold the battery in place while removing each bolt.
While you may think the point of a lift table is to handle the weight of heavy battery packs, that is only part of its mission. Equally important is being able to precisely line up the connectors on the vehicle with those on the battery pack. With this table, you can not only move the battery up and down but can also slide it horizontally with millimeter precision.
It allows you to position the battery pack and rapid mate connector on a Tesla, as well as similar connectors used by many other EVs and hybrids.
Once the battery is removed, the rapid mate connector can be serviced. The first step is to remove the bolt that secures it to the bracket and the plastic cover that secures the high-voltage cables. Now, you can pull it down to service the connector. You can detach the connector by pressing these tabs on the side of the bracket. While gently pulling down on the high-voltage blades, pull up on the housing to separate the housing from the blade retainer. Release the clips that secure the blade retainer to the high-voltage cables. Remove the blade retainer and discard it. To reinstall a battery pack, replace the seal and retainer clip.
When the battery is reinstalled, positioning the connector and battery pack is critical. Trying to make millimeter adjustments while the battery pack is on pallets, carts, or other repurposed piece of furniture is impossible. This can lead to damage to the battery pack and rapid mate connector. This is why you need a specially designed EV battery lift table.