Archives March 2025

Understanding ADAS: Blindspot Detection Systems


Blindspot detection was one of the earliest Advanced Driver Assistance Systems (ADAS) features offered on vehicles. The system alerts the driver to objects in the blind spot of the vehicle. Servicing these systems is straightforward to diagnose and repair.

Theory and Operation

Blindspot detection systems can use radar or cameras, and some systems use both. The radar sensors emit radiowaves that bounce off objects and are received by the sensor. The sensors are mounted in the rear bumper. Camera systems will have cameras mounted to the side mirrors or A-pillar. The image from the camera is processed by a computer to classify the object. Some systems will use both radar and camera sensors to make a more accurate classification.

This information is processed to ensure the object in the blind spot is a vehicle, guard rail or pedestrian. The more info provided by the camera and radar, the fewer false alerts. 

The blind spot sensors can also be used as a cross-traffic detection system. These systems extend the range of radar sensors to detect vehicles when they are in reverse.

Inputs

Radar sensors have a range that starts at the rear of the front doors up to 20 feet behind the vehicle. Some sensors used for cross-traffic detection can extend the range of the sensors up to 230 feet. Most radar sensors process the signals internally and communicate with a module.

Cameras have what could be called a “fisheye” lens. Cameras must be able to capture images during the day and night. The images from the system are processed by a camera module and can determine if an image is headlights, road spray or snow. The cameras have a shielded cable that carries the signal from the camera to the module. 

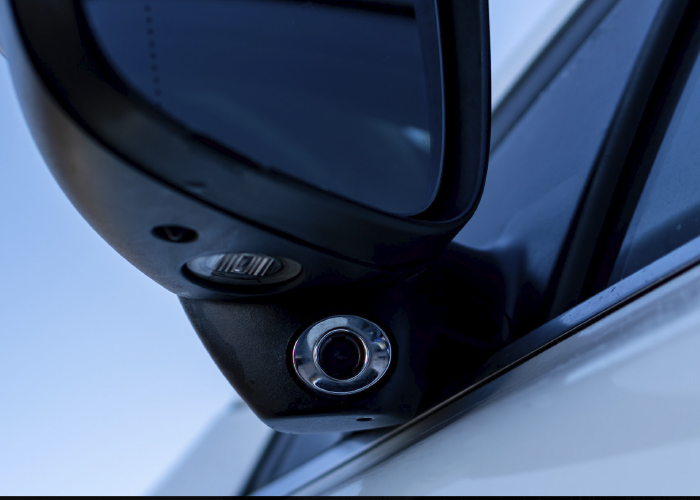
Cameras and radar sensors are typically located in impact-prone areas. Cameras are typically in the sideview mirrors. Radar sensors are often behind or attached to the back of the rear bumper cover. These are some of the most prone areas for impacts. Always make it a point to visually inspect the vehicle and sensors for damage. Look for how the bumper covers line up with the rear quarter panel or how the mirrors sit on the door.  

Vehicle speed is an essential piece of data for radar and camera sensors. For the blind spot detection sensors to work, the vehicle has to be moving. For most vehicles, the speed is around 5 mph. How the system processes the inputs from the sensor changes as vehicle speed increases.

GM vehicles will also use GPS to control the radar components of the system. For example, if a vehicle enters the Radio Astronomy Zone or National Radio Quiet Zone in Maryland, Virginia and West Virginia, the blind spot detection will deactivate. These zones have very little background radio interference. The zones have both astronomy and military applications.

Outputs

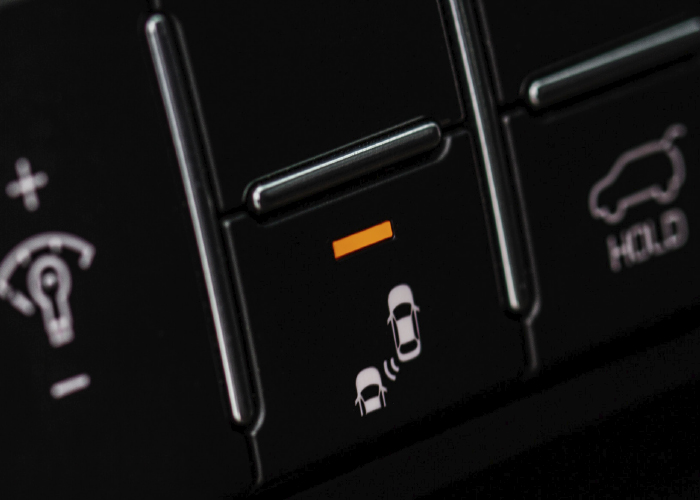
Every system uses warning lights in the sideview mirror glass to alert the driver to objects in blind spots. Some vehicles will give audio alerts. The infotainment systems on most vehicles are used to alert the driver of objects in the blind spots. The audio alerts can be sent to different speakers depending on the location of the object. Some vehicles may use a seat shaker to alert the driver. Some vehicles will shake the steering wheel. 

Early blind spot detection systems had issues with false alerts. Many drivers became annoyed with the systems and turned them off or turned down the sensitivity. More advanced systems use radar sensors, cameras and information from systems like the lane departure. More data and faster computer processors have decreased the number of false alerts. 

Calibration 

Most radar sensors have a self- or dynamic-calibration procedure. This procedure may require a scan tool to initialize the process and a test drive.

Camera systems may require calibration if the unit is replaced or moved. Some of these calibration procedures require target mats to be placed on the floor next to the vehicle. The process will require a scan tool to initiate the calibration procedure.


Automotive

The Essential Role of Effluent Treatment Plants in Automotive Industries and its Process


Water is a vital resource used in various industries for multiple purposes. In industrial settings, water is crucial for tasks such as washing, cooling, heat exchange, and steam condensation. However, water in industries is not entirely consumed; it is used and then often discharged as wastewater, requiring proper treatment before being released into the environment. Improper disposal of untreated wastewater can significantly harm the surrounding ecosystem.

In many industrial sectors, by-products that become contaminated with water are known as effluents. This water, whether treated or untreated, needs to undergo treatment to meet environmental standards before it can be safely discharged. Effluent Treatment Plants (ETPs) are designed to process such wastewater and transform it into treated effluent, which can then be safely reintroduced into the environment. In some cases, ETPs are also referred to as Sewage Treatment Plants (STPs).

The Role of Effluent Treatment in the Automotive Industry

With rapid advancements in science and technology, the automobile industry has seen a significant rise in production. This growth has, unfortunately, led to a corresponding increase in wastewater generation. The automobile sector is one of the key industries contributing to environmental pollution by releasing hazardous wastewater.

Common Pollutants in Automotive Wastewater

The automobile industry is a major consumer of water, which is used throughout the production process, such as vehicle washing, painting, and rinsing. This high-water usage generates large volumes of wastewater, containing various contaminants, including:

  • Total Suspended Solids:
    These include metals, oils, grease, detergents, dyestuffs, chromium, phosphates, paint residues, hydrofluoric acid, and ammonium bi-fluoride products.
  • Organic and Inorganic Pollutants:
    A combination of both types of pollutants is often present in automotive effluents.
  • BOD (Biological Oxygen Demand) and COD (Chemical Oxygen Demand):
    These are key indicators of the organic matter content in the wastewater, affecting its environmental impact.

Why is Effluent Treatment Plants Important?

The treatment of wastewater generated by the automotive industry is essential to prevent contamination of natural water sources. Effluent Treatment Plants (ETPs) treat this wastewater, making it safe for release or even reuse. The water treated by ETPs is environmentally safer, and in some cases, it can be recycled for use in other industrial processes. Wastewater from the automobile industry, if left untreated, poses significant risks to both human health and the environment.

The ETP Process for the Automotive Sector

Effluent Treatment Plants play a crucial role in ensuring that contaminated water is treated and meets environmental standards before being released back into natural bodies of water. The treatment process typically involves multiple stages, each targeting specific contaminants. The key stages of treatment in an ETP for the automobile industry are:

Physical Treatment
This stage involves basic processes to remove solid contaminants, such as suspended solids and oils. Techniques like screening, grit chambers, and oil and grease traps are commonly used in this stage to ensure that larger particles are removed before further treatment.

Chemical Treatment
During primary treatment, chemical processes such as coagulation, flocculation, and neutralization are employed. This process helps remove heavy solids, oils, and other light contaminants. The heavier solids settle at the bottom as primary sludge, while lighter materials float and are skimmed off. The remaining wastewater is then sent for secondary treatment.

Biological Treatment
In the secondary treatment stage, biological processes are used to eliminate dissolved and suspended organic matter. Aerobic processes, such as the activated sludge process, are commonly used in this step to treat wastewater. This stage is highly effective in reducing BOD and COD, often removing up to 90% of these pollutants.

Tertiary Treatment
The final stage of treatment is crucial for ensuring that the treated water meets regulatory standards. Tertiary treatment typically involves disinfection methods such as chlorine, ozone, or ultraviolet (UV) light treatment. It also removes any remaining suspended solids that were not captured in previous stages. The treated effluent is now of a quality that is safe to be released into the environment.

Conclusion

Effluent Treatment Plants are essential in the automobile industry to reduce environmental pollution and ensure that wastewater is treated to acceptable levels before being discharged into nature. By employing a combination of physical, chemical, and biological processes, ETPs help to mitigate the harmful impact of automotive wastewater on human health, wildlife, and the surrounding ecosystem.

References


Automotive

Better Ball Joints


Ball joints have been on most vehicles for more than 70 years. They were replacements for kingpins, but they also became essential for independent suspensions.

While the basics of the ball joints have remained the same, the materials have improved along with design refinements that enable the joint to last longer and carry greater loads. In the aftermarket, some manufacturers have focused on improving the OE designs and adding serviceability to the joint.

Materials Matter

All ball joints manufactured in the past 70 years have benefitted from better materials that improve every year. High-tech elastomeric materials are now used on most ball joint boots instead of basic rubber. These materials remain more pliable under different temperatures and help to keep a wide range of motion longer.

These materials can withstand heat from the brakes and environmental dangers like ozone and fluids better than their predecessors. With better engineering tools, the designs of the boots have resulted in more compact packaging.

Another element that has improved is the methods of sealing the boot to the base and stud. In the past, many boot designs were a friction fit, where the elasticity and bellows of the boot held it in place. Over time, the materials would lose their elasticity and no longer have the ability to seal the boot against the elements.

New boot designs are using metal rings to hold the boot in place. Some aftermarket manufacturers are engineering the boot and joint together with slots in the base and stud to secure the boot.

The Boot

The materials used to manufacture ball joint boots have improved by leaps and bounds. New materials can last longer in extreme conditions while having the same range of movement. New material and boot designs seal better and can retain grease longer.

On both sealed and greaseable joints, the boot is the most vulnerable part. If a boot is torn or is no longer adequately retained on the stud or body, moisture and contamination can enter the joint.

Inspection of the boot is just as important as measuring play. Looking for damage might require running your finger around the boot. The advantage of the greaseable joint is that when the joint is filled with grease, the grease will escape out the hole.

How the boot is retained on the stud and base has also improved. Some ball joint manufacturers have reduced the size of their boots to minimize the possibility of boot damage and to enhance retention of the boot on the stud and base.

When installing a ball joint or boot, look at the manufacturer’s instructions and recommendations. Some boots are retained by a lip on the ball joint’s body, while others may use a snap ring at the top or bottom. Using universal boots is never recommended. These may not offer the same range of motion and expose the joint under certain conditions.

Grease

All ball joints have one thing in common: grease. Grease reduces friction and wear on the surfaces of the ball and socket. For greaseable joints, it is recommended that a National Lubricating Grease Institute (NLGI) certified GC/LB rating is used for ball joints. This grease is designed to withstand extreme pressures, oxidation and prevent corrosion. Use of a general purpose or non-certified chassis grease will not offer the same level of protection as a NLGC GC/LB certified grease.

Flushing the Joint

When you are lubricating a ball joint through the Zerk fitting, you are not just “topping off” the grease. The grease can flush debris and moisture out of the joint. This is one of the main advantages of a greaseable joint.

Most greaseable joints have a relief valve where the boot meets the stud. When grease is pumped into the joint, the old grease will be forced out the relief valve. The right amount of grease in the joint and boot acts as a seal that occupies space that water and debris could take up. Pump only enough grease until fresh grease can be seen coming out the relief valve.

If the grease is not coming out of the top of the boot, do not keep pumping. The pressure inside the joint can dislodge the boot from the base. Try clearing the relief valve with a blunt pick to remove the obstruction.

Inspection

To check a loaded ball joint, place a jack or jack stand under the lower control arm to support the weight of the vehicle. Attach a dial indicator to the lower control arm and set the dial in a vertical position to measure axial runout at the steering knuckle. In the case of an all-wheel-drive front ride strut or independent RWD, it may be necessary to mount the dial at the CV joint. Moving the steering knuckle can check lateral runout.

For a short/long arm (SLA) suspension that has the coil spring over the top arm, the upper joint is loaded. To check the joint, the upper control arm is supported to unload the joint. If the ball joint has a built-in wear indicator, joint play should be checked with the vehicle on its wheels. These designs are rare these days.

To check a follower-type joint, the Belleville washer or spring is loaded or compressed to check for axial end play. For a strut-type suspension, place a jack stand under the cradle to allow the strut to fully extend. Attach the dial indicator clamp to the lower control arm and set the dial in a vertical position to measure axial runout at the steering knuckle. Place a jack under the ball joint and load the joint by raising the jack. Turn the steering wheel and observe the ball joint to check lateral runout.

For an SLA suspension, the upper control arm can be blocked, and the joint can be compressed. Attach a dial indicator to the steering knuckle and place it in a vertical or parallel position to measure axial runout at the lower control arm. Moving the steering knuckle can check lateral runout.

Installation

In theory, an impact should never be used to install the nut that secures the ball joint’s stud to the knuckle. This can damage the joint by heating it up due to friction. The heat and motion can hurt a plastic joint inside the joint and even the sintered metal bearings. Even if the joint is metal on metal, the fast rotation can displace the grease.

 It is for this reason that OEMs and aftermarket chassis suppliers have tiny bolt heads or recessed Allen heads to hold the stud while the nut is tightened. Some aftermarket manufacturers are including wrench flats lower on the stud to make installation easier.

Stud designs have changed to accommodate aluminum knuckles. If you see a ball joint stud with a 45-degree taper and a long-threaded stud, chances are it is going into an aluminum knuckle. These typically have torque angle specification that recommends an initial torque specification followed by an angle. Failure to use the correct procedure will result in a broken fastener or a loose joint that can damage the knuckle.


Automotive

Undercar CAN Bus Diagnostics


If serial data buses did not exist, a wiring harness would have to be five times its normal size and use twice as many sensors to deliver the same level of functionality and safety we see in the modern vehicle. For example, take a brake pedal sensor. On a modern vehicle, the position of the brake pedal is used by the shift interlock, ABS system, cruise control, traction control, brake lights and electric emergency brake. If each system required its own switch and wiring, the complexity of the wiring harness and switches would be a diagnostic nightmare. 

Serial data buses help to eliminate multiple sensors and wiring. One sensor can share information with multiple modules without having to connect directly to the multiple modules.

What is On The Serial Data Bus?

A serial data bus uses voltage to communicate. Modules toggle the signal off and on, making the 1s and 0s of digital binary language like Morse code. This code can communicate commands that allow something as simple as rolling up a window or as complex as stability control correction.

Zero volts on any serial data bus is translated into binary language as “1,” and when the voltage increases the voltage to a specified level, it equals “0.” Most electronic devices operate on signals toggling between 0 and 5 volts.

On most automotive serial data buses, the peak voltage level might be 7 volts. This extra voltage is to accommodate resistance in the wires and ground problems that may cause voltage drops. 

If a signal was on an equal length of time as it was off, you would have 0, 1, 0, 1, 0, 1 as the binary message being sent out. It could represent what the throttle position voltage is, a signal being sent from the airbag module to the BCM reporting the status of a sensor.

Whatever the bus message, it’s comprised of 0s and 1s, or the states of highs and lows. Some systems use a variable pulse width that not only toggles between on/off, but can transmit additional information by varying the length of time the voltage is either on or off. This is how all serial data buses operate. You are never going to be able to look at the signals on a scope, decipher a series of 1s and 0s, and say that it is a command to turn on the brake light. What it can tell you is that a module is communicating and the bus is active. 

Reading the Wiring Diagram

As a technician in the modern vehicle era, you’re going to need to understand these “bus lines.” The dotted line at the edge of the component, node or module indicates where the CAN bus enters and exits.

Some schematics may include other information in the boxes with two arrows pointing in opposite directions. All two-wire CAN bus lines terminate in a resistor(s) of a known value. This is what produces the correct amount of voltage drop.

Voltages

One of the most critical aspects of networked modules is the requirement for healthy system voltage being supplied to the various modules. If the system voltage drops below 10 volts during a non-cranking event for modules on a hi-speed CAN bus, some modules will shut down and communication will cease. Some system like ABS and electric power steering may go into a limp- or safe-mode. 

For some vehicles a sudden drop in voltage could be caused by a weak battery or an issue with a power distribution module. Often a low voltage event might occur after the engine is started and modules might be performing self-diagnostic tests when the loads on the alternator are the greatest. Also if the alternator or battery are not working properly, a sudden correction by the ABS, stability control or electric power steering system could put enough load on the system to cause the modules and CAN bus to shut down.

The post Undercar CAN Bus Diagnostics appeared first on Brake & Front End.


Automotive

PRT Launches 27 New Products in North America


PRT announced the launch of 20 new products in North America. The new part numbers include complete strut assemblies and shock absorbers, representing nearly 8 million vehicles in new coverage. The launch includes coverage for light vehicles like the Hyundai Sonata, Mercedes-Benz C-Class and Subaru WRX, in addition to popular pickup truck applications, including the Ford F-150, Chevrolet Silverado and the Dodge Ram 1500, among others, according to PRT.


Automotive

Building the Future of the Automotive Industry


The technician shortage is no secret, but the solution might be closer than you think. In a recent Tomorrow’s Technician Partnership Pathways podcast, Van Harris, a regional sales rep for NAPA Auto Parts, shared how strong partnerships between schools, shops, and suppliers can help secure the future of the industry.

Harris has been working with automotive training programs for over two decades, helping schools like Chapel Hill High School transform their programs from underfunded afterthoughts into thriving pipelines for skilled technicians. Under the leadership of instructor Robert Ballard, the program has grown from 50 students to over 300, thanks in part to strategic industry support.

Why Should Shop Owners Care?

Harris makes a powerful case: if today’s repair shops don’t invest in technician training, they won’t have a workforce tomorrow. He regularly brings shop owners, dealership representatives, and industry leaders into classrooms to showcase the talent being developed and encourage them to engage with students directly.

Shops that get involved now can:
✅ Build relationships with future techs before they enter the job market.
✅ Help shape training programs to ensure students develop real-world skills.
✅ Create mentorship and apprenticeship opportunities that benefit both students and businesses.

How Can Shop Owners Get Involved?

1️⃣ Join advisory boards – Schools need input from industry professionals to shape their programs.
2️⃣ Offer hands-on training – Loaning tools, donating equipment, or providing shop tours can make a big impact.
3️⃣ Mentor students – Encouraging young talent and offering internships builds a stronger workforce.
4️⃣ Support diversity in the trade – With 33% of students in Ballard’s program being female, now is the time to foster inclusive opportunities.

Harris emphasizes that this isn’t charity—it’s an investment. As he puts it, “If you don’t invest in this, you won’t have a business in 10 to 15 years.”

The Bottom Line

Shops that take an active role in training the next generation will be the ones with the skilled techs needed to stay competitive. If you’re not already working with a local school, now’s the time to start.

#AutomotiveIndustry #FutureTechnicians #InvestInTalent #ShopOwnerSuccess #WorkforceDevelopment


Automotive

Brake Boosters and Start/Stop Vehicles


Vacuum brake boosters will probably be with us for a long time. It is the most efficient and economical way to amplify the force exerted by the driver. But where the booster gets its vacuum is changing. Many import and domestic nameplates have been using vacuum pumps to power the brake booster on their gas-, diesel- and even electric-powered vehicles. 

For a vacuum brake booster to work, it needs a source of vacuum. In the past all that was needed was a port on the intake manifold. Now, vacuum pumps are the choice for negative pressure power.

Why a Vacuum Pump?

In every piston engine, vacuum is generated during the intake stroke as the piston goes down in the cylinder and the intake valves are open. But modern engines have changed. Increased efficiency has reduced the amount of vacuum available to the brake booster. Engines have been downsized to 2.0- and even 1.4-liters. This means that there is less displacement to generate the vacuum. 

Variable valve timing has further diminished the vacuum generated because the timing of the opening might be timed to allow a scavenging effect so some of the intake air makes it past the exhaust valve. This air is intended for the catalyst so unburned hydrocarbons can be burned.

Turbocharging has also eliminated traditional vacuum in the intake manifold. The turbocharger produces positive pressure or boost in the intake manifold. The only time an engine might be under vacuum is when the engine is decelerating, and the throttle is closed. 

What Type of Pump? 

Vacuum pumps have been used on diesel engines for more than 40 years, typically as a diaphragm pump. These pumps were neither efficient nor reliable.

Most modern VWs use either an electric vacuum pump or a pump driven by a sprocket connected to the timing chain. These pumps use vanes attached to an offset shaft. As the shaft rotates, the vanes create a sealed chamber with the walls of the housing. 

Since the shaft is offset, the chambers change in volume and produce a vacuum on the outlet side when turned. Electric pumps typically have multiple vanes; timing chain-powered pumps use just one vane. 

Electric-powered vacuum pumps are controlled by the engine control module. The system uses a pressure sensor mounted between the pump and the booster. The ECM will look at the vacuum, brake pedal position and other engine parameters. The vacuum pump is controlled with a relay that is actuated by the engine control module. The pump is turned on for 2- to 3-seconds during startup.

Timing chain-powered pumps are lubricated with engine oil. The oil inlet is next to the shaft and is fed from the oil slung off the timing chain and sucked into the pump through a valve that controls the level of oil. 

While it is rare for the vanes to wear out, it is possible for carbon and debris to enter the pump and cause damage to the vanes and housing. If the vanes can’t seal against the housing, a vacuum can’t be generated. The most common symptom of a worn pump is a hard brake pedal. 

The Booster

No matter if the booster gets vacuum from the engine or a pump, if it is damaged, the brake pedal performance will change. The condition of the diaphragm inside the booster is also important. If it’s cracked, ruptured or leaking, it won’t hold vacuum and can’t provide much power assist. Leaks in the master cylinder can allow brake fluid to be siphoned into the booster, accelerating the demise of the diaphragm. 

If there’s brake fluid inside the vacuum hose, it’s a good indication that the master cylinder is leaking and needs to be rebuilt or replaced. Wetness around the back of the master cylinder would be another clue for this kind of problem.

To check the vacuum booster, pump the brake pedal with the engine off until you’ve bled off all the vacuum from the unit. Then, hold the pedal down and start the engine. You should feel the pedal depress slightly as engine vacuum enters the booster and pulls on the diaphragm. No change? Then check the vacuum hose connection and engine vacuum. If it’s OK, the problem is in the booster, which needs to be replaced.


Automotive

Continental Metric Belt for Import Applications


Continental Multi-V belts are designed for OE-quality performance in both domestic and import applications. Learn about the different belt technologies, including Elast stretch belts, Extra belts for hybrid vehicles, and dual-sided belts for specialized accessory drives.

This video is sponsored by Continental Belts and Hose.

The post Continental Metric Belt for Import Applications appeared first on Brake & Front End.


Automotive

Bagaimana cara memahami istilah-istilah dalam permainan slot server Thailand

Jika Anda ingin bermain slot online di server Thailand, penting untuk memahami berbagai istilah yang digunakan dalam permainan. Dengan memahami istilah-istilah ini, Anda bisa lebih mudah memilih permainan yang tepat, mengoptimalkan strategi, dan meningkatkan peluang kemenangan.


🔹 1. Istilah Dasar dalam Slot

IstilahPenjelasan
SpinPutaran gulungan dalam permainan slot.
PaylineGaris pembayaran tempat simbol harus sejajar agar menang.
Reel (Gulungan)Kolom vertikal tempat simbol muncul dalam slot.
Row (Baris)Baris horizontal yang membentuk kombinasi slot.
Balance (Saldo)Jumlah uang yang tersedia untuk bertaruh.
Bet (Taruhan)Jumlah uang yang dipertaruhkan per spin.
Win (Menang)Jumlah uang yang didapat setelah menang dalam satu spin.

📌 Tips:
Pilih slot dengan banyak paylines untuk lebih banyak peluang menang.
Sesuaikan taruhan dengan saldo agar bisa bermain lebih lama.


🔹 2. Istilah Terkait Fitur Bonus

IstilahPenjelasan
WildSimbol yang bisa menggantikan simbol lain untuk membentuk kombinasi menang.
ScatterSimbol yang memicu fitur Free Spins atau Bonus Game tanpa harus sejajar di paylines.
Free SpinsPutaran gratis tanpa mengurangi saldo taruhan.
MultiplierPengganda kemenangan (misal x2, x5, x100).
Bonus GameMode permainan khusus dengan hadiah tambahan, sering diaktifkan oleh Scatter.
Sticky WildWild yang tetap di tempatnya selama beberapa putaran.
Expanding WildWild yang meluas ke seluruh gulungan untuk meningkatkan peluang menang.

📌 Tips:
Cari slot dengan fitur Free Spins & Multiplier besar untuk menang lebih banyak.
Perhatikan kapan Scatter muncul untuk memanfaatkan fitur bonus.


🔹 3. Istilah Terkait RTP, Volatilitas, dan Pola Slot

IstilahPenjelasan
RTP (Return to Player)Persentase pengembalian ke pemain dalam jangka panjang. RTP tinggi (96%+) lebih menguntungkan.
VolatilitasMenentukan seberapa sering slot membayar dan seberapa besar hadiahnya.
High VolatilityKemenangan besar tapi jarang. Cocok untuk pemain yang sabar dan punya modal besar.
Low VolatilityKemenangan kecil tapi sering. Cocok untuk pemula atau pemain dengan modal kecil.
Hit Rate (Frekuensi Kemenangan)Seberapa sering slot memberikan kemenangan dibandingkan jumlah total spin.

📌 Tips:
✅ Jika ingin menang cepat, pilih slot volatilitas rendah dengan RTP tinggi.
✅ Jika mengejar jackpot besar, pilih slot volatilitas tinggi seperti Gates of Olympus.


🔹 4. Istilah Terkait Mode Bermain

IstilahPenjelasan
Auto SpinMode otomatis untuk menjalankan spin tanpa menekan tombol setiap kali.
Turbo ModeMode mempercepat animasi spin untuk hasil lebih cepat.
Demo ModeMode bermain gratis tanpa uang asli, cocok untuk latihan.
Max BetTaruhan maksimum dalam satu spin untuk peluang menang terbesar.
Min BetTaruhan minimum dalam satu spin untuk bermain lebih lama.

📌 Tips:
Gunakan Demo Mode sebelum bermain uang asli untuk memahami pola slot.
✅ Jika saldo terbatas, hindari Max Bet agar bisa bermain lebih lama.


🔹 5. Istilah Terkait Jackpot & Bonus Tambahan

IstilahPenjelasan
JackpotHadiah terbesar dalam permainan slot.
Progressive JackpotJackpot yang terus bertambah hingga ada pemain yang menang.
Fixed JackpotJackpot dengan nilai tetap, tidak berubah seiring waktu.
RespinFitur yang memungkinkan pemain memutar ulang gulungan tertentu tanpa biaya tambahan.
Tumble Feature (Cascading Reels)Simbol pemenang hilang dan digantikan oleh simbol baru dalam satu putaran, bisa memicu kemenangan beruntun.

📌 Tips:
✅ Pilih slot dengan Jackpot Progresif jika ingin peluang menang besar.
✅ Gunakan Cascading Reels untuk mendapatkan kemenangan berturut-turut dalam satu spin.


🎯 Kesimpulan: Menguasai Istilah Slot untuk Menang Lebih Banyak

Memahami istilah-istilah dalam permainan slot di server Thailand bisa membantu Anda memilih game terbaik, mengatur strategi, dan memaksimalkan kemenangan.

🔥 Rekomendasi:
✔️ Pilih slot dengan RTP tinggi (96%+) dan volatilitas sesuai gaya bermain Anda.
✔️ Manfaatkan fitur Wild, Scatter, Free Spins, dan Multiplier untuk peluang menang lebih besar.
✔️ Gunakan Demo Mode untuk latihan sebelum bermain dengan uang asli.

Dengan pemahaman yang lebih baik, Anda bisa bermain lebih cerdas dan meningkatkan peluang menang!